In order to deploy a smart contract, we will use Remix IDE. Why I’ve chosen this tool? Because it is online so we don’t need to install any tool.
Open the Remix IDE, write your code and compile it. 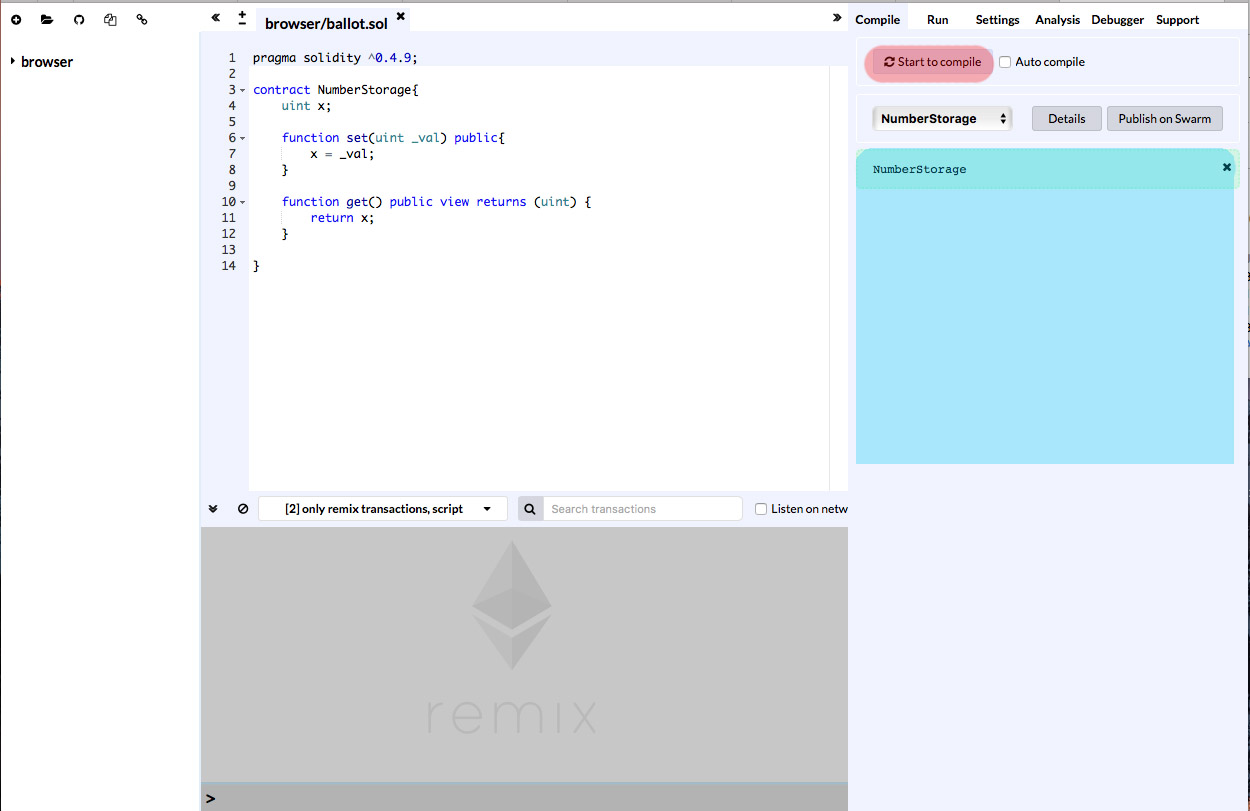
Here you can see the IDE. The red highlight shows the button used to compile the code. The compilation result is hidden. To view the result you have to click on “Detail”, next to contract name. On the detail popup, you can find the bytecode and the ABI (Application Binary Interface).
Here a bytecode example:
{
    "linkReferences": {},
    "object": "6060604052341561000f57600080fd5b60d38061001d6000396000f3006060604052600436106049576000357c0100000000000000000000000000000000000000000000000000000000900463ffffffff16806360fe47b114604e5780636d4ce63c14606e575b600080fd5b3415605857600080fd5b606c60048080359060200190919050506094565b005b3415607857600080fd5b607e609e565b6040518082815260200191505060405180910390f35b8060008190555050565b600080549050905600a165627a7a723058204881d82089bda01e4ec7266d952fb3def9c79305d32b72bf5c04ae9c690616ca0029",
    "opcodes": "PUSH1 0x60 PUSH1 0x40 MSTORE CALLVALUE ISZERO PUSH2 0xF JUMPI PUSH1 0x0 DUP1 REVERT JUMPDEST PUSH1 0xD3 DUP1 PUSH2 0x1D PUSH1 0x0 CODECOPY PUSH1 0x0 RETURN STOP PUSH1 0x60 PUSH1 0x40 MSTORE PUSH1 0x4 CALLDATASIZE LT PUSH1 0x49 JUMPI PUSH1 0x0 CALLDATALOAD PUSH29 0x100000000000000000000000000000000000000000000000000000000 SWAP1 DIV PUSH4 0xFFFFFFFF AND DUP1 PUSH4 0x60FE47B1 EQ PUSH1 0x4E JUMPI DUP1 PUSH4 0x6D4CE63C EQ PUSH1 0x6E JUMPI JUMPDEST PUSH1 0x0 DUP1 REVERT JUMPDEST CALLVALUE ISZERO PUSH1 0x58 JUMPI PUSH1 0x0 DUP1 REVERT JUMPDEST PUSH1 0x6C PUSH1 0x4 DUP1 DUP1 CALLDATALOAD SWAP1 PUSH1 0x20 ADD SWAP1 SWAP2 SWAP1 POP POP PUSH1 0x94 JUMP JUMPDEST STOP JUMPDEST CALLVALUE ISZERO PUSH1 0x78 JUMPI PUSH1 0x0 DUP1 REVERT JUMPDEST PUSH1 0x7E PUSH1 0x9E JUMP JUMPDEST PUSH1 0x40 MLOAD DUP1 DUP3 DUP2 MSTORE PUSH1 0x20 ADD SWAP2 POP POP PUSH1 0x40 MLOAD DUP1 SWAP2 SUB SWAP1 RETURN JUMPDEST DUP1 PUSH1 0x0 DUP2 SWAP1 SSTORE POP POP JUMP JUMPDEST PUSH1 0x0 DUP1 SLOAD SWAP1 POP SWAP1 JUMP STOP LOG1 PUSH6 0x627A7A723058 KECCAK256 0x48 DUP2 0xd8 KECCAK256 DUP10 0xbd LOG0 0x1e 0x4e 0xc7 0x26 PUSH14 0x952FB3DEF9C79305D32B72BF5C04 0xae SWAP13 PUSH10 0x616CA00290000000000 ",
    "sourceMap": "25:145:0:-;;;;;;;;;;;;;;;;;"
}
So, now we have our contract compiled. Now we have to deploy our contract on the blockchain. In order to deploy it we need to do a choice:
- deploy it on a test net
- deploy it on a local VM that emulate the Ethereum Network
Deploy it locally on a Javascript VM
Move our attention on the run tab.
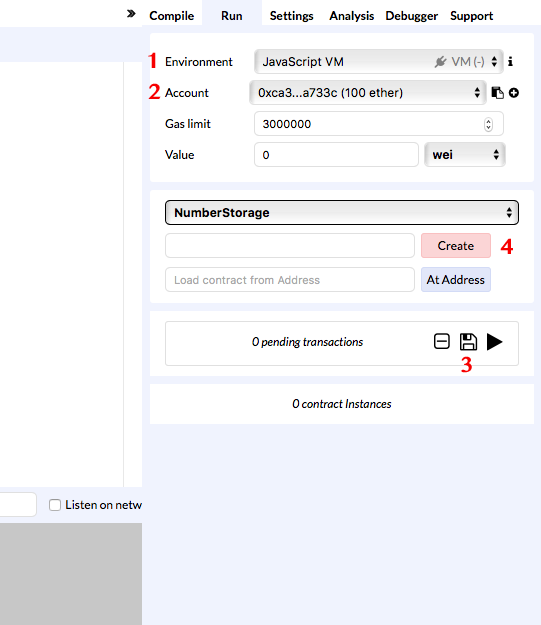
Here we can choose how to deploy our contract. In order to run it locally, we select as Environment the Javascript VM (1). This choice generates 5 ethereum address, selectable from Account select, each of them with 100 ether (2).
So, now we have to deploy it that means to create a transaction that deploys it. Since we are running a local VM that emulate a network, we need a scenario that describes the state of the net. In order to create an empty one, click on the save icon and then save the file scenario.json (3).
And finally, we are ready to deploy the contract. Click on create button (4) and your contract is deployed. To interact with your contract, i.d. invoke its function, you can use the panel that is appeared on the right:
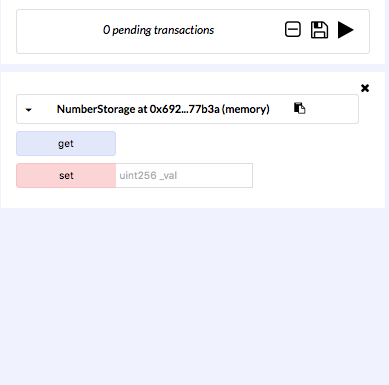
To invoke a function, that means to run a transaction on the local node, you can simply click on the function name in that panel. If the function requires some parameter, type them into the input field separated by commas.
How to deploy it on the Ethereum Test Net
To deploy the contract on the Ethereum Network, that can be tested net or main net, we have to run a node on a chosen network and connect Remix to our node.
The simplest way I have found is to add MetaMask to Chrome Extension. It is an Ethereum Wallet that will do all the dirty work for you. So, install the extension, create an account and select a test net. I’ve chosen Rinkeby.
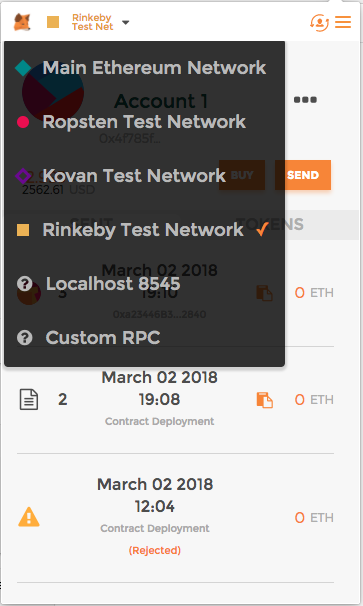
Now we need some Ether to try our contract. Fortunately, the Ether on TestNet has no value and so exists some faucet that gives you Ether for free. For Rinkeby exists this one.
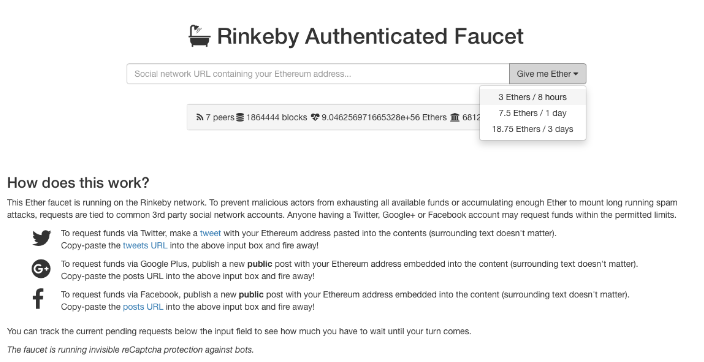
In that faucet you have to authenticate yourself to receive some money: publish your ethereum address on a public post on Twitter, Google+ or Facebook, then copy the post permalink on the faucet input. After that operation, you will receive your free Ether on your account.
Now we need to connect MetaMask provider to Remix. The simplest way is to open both on Chrome, then select the Environment Remix as Injected Web3 (see the previous image, step number 1). In the account selectable field should appear your MetaMask address with your 3 Ether.
Now you can deploy the contract clicking on create button. Of course, you don’t need to set any scenario since the scenario in the test net status. It will open a MetaMask window that asks to approve the transaction and here you can set the input values as Gas cost.
Congratulation! Your contract is on the Test Net!
Deploy in the real world
To deploy a contract on the main net, you can simply change the network from MetaMask. =)