Versione italiana a seguire
Let’s start today to build your own Wifi Repeater with low budget and a bit of coding.
Components and circuits
For this project we need:
- WiFi Module ESP-01, con microcontrollore ESP8266 - 1,70€
- Stripboard, 1€ al negozio di elettronica sotto casa
- Some other components (1,5€)
- A Capacitor
- 1 Resistor 3.3KOhm
- 1 Resistor 5.6KOhm
- 10 Pin Header
- 1 LM317T
- USB-SerialPin Connector, 3€ on eBay (it needs only on build project, so ask to your friend to lend it).
Build a circuit
First of all we need to build a circuit to run the project. The scheme is the following (the same used in the mesh network project): 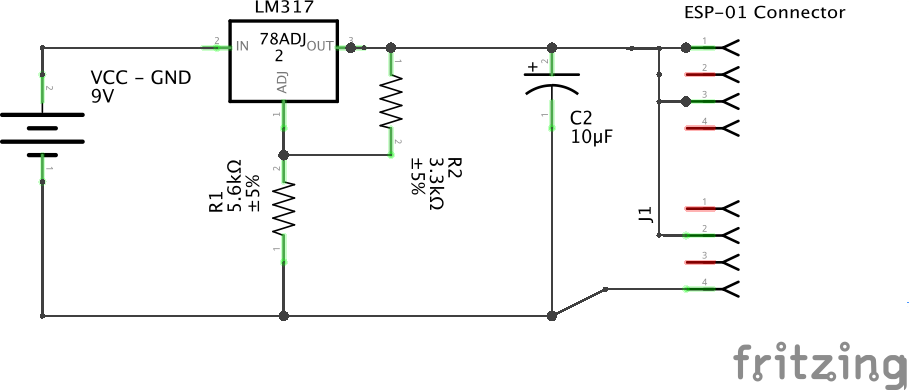
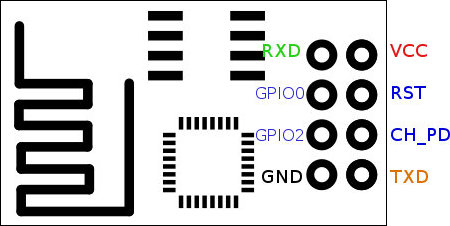
To put this few components, I leave room for your imagination. This circuit will feed your ESP-01 module with a 9V battery or, eventually, a series of AA batteries. Connections of pins are the following:
| Pin | Connected to |
|---|---|
| VCC | 3.3V |
| RST | not connected |
| CH_PD | 3.3V |
| TXD | not connected |
| RXD | not connected |
| GPIO | 3.3V |
| GPIO2 | not connected |
| GND | GND |
Sofware
Software side, we need to coding a bit. The library I used is è eps_wifi_repeater, avaiable on GitHub.
To build and deploy the firmware you can find the guide on the README of the repo, we build the code remembering that us module is ESP-01.
First of all we need to install esptool, a software that is able to flash the module with just a simple line. To download it execute on the terminal:
git clone https://github.com/themadinventor/esptool.git
or, with pip:
pip install --upgrade esptool
Connect now your ESP-01 to pc using the usb-serial connector with this pin connections: 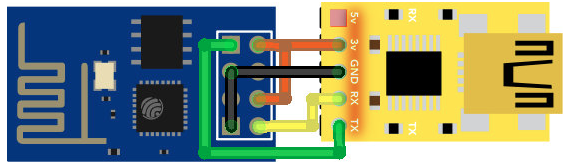 Now download a wifi-repeater library
git clone https://github.com/martin-ger/esp_wifi_repeater.git
cd esp_wifi_repeater
and flash it on ESP-01, writing
esptool --port /dev/ttyUSB0 write_flash -fs 8m 0x00000 firmware/0x00000.bin 0x10000 firmware/0x10000.bin
If for some reason it not works, flash the previuos version build with the previous SDK. You can do that writing:
esptool --port /dev/ttyUSB0 write_flash -fs 8m 0x00000 firmware_sdk_1.5.4/0x00000.bin 0x40000 firmware_sdk_1.5.4/0x40000.bin
Let’s stat
Now we have almost finished, connect the ESP-01 to the circuit, feed by the battery. Power on the pc, connect it to myAP net and, using telnet we are going to set all the parameters:
telnet 192.168.4.1 7777
The console appears, insert the following commands:
set ap_open 0
set ssid YOUR_HOME_WIFI_NETWORK_NAME
set password YOUR_WIFI_PASSWORD
set ap_ssid NEW_NETWORK_NAME
set ap_password NEW_NETWORK_PASSWORD
save
show config
Now your repeater is ready. Of course, it is not so fast but is fast enough to surf on facebook or, why not, stream a movie from Netflix.
ITALIAN VERSION
Vediamo oggi come realizzare un ripetitore WiFi a bassissimo costo, con un poco di ingegno e manualità.
Componenti e circuito
Per questo progetto useremo
- Modulo WiFi ESP-01, con microcontrollore ESP8266 - 1,70€
- Scheda millefori, 1€ al negozio di elettronica sotto casa
- Altri componenti minori (1,5€)
- Un condensatore
- 1 Resistenza 3.3KOhm
- 1 Resistenza 5.6KOhm
- 10 Pin Header
- 1 LM317T
- Connettore USB-SerialPin, 3€ su eBay (vi servirà solo all’inizio, potete farvela prestare)
Costruiamo il circuito
Per iniziare dobbiamo costruire il circuito per far funzionare il tutto. Lo schema è il seguente (è lo stesso usato nel progetto della rete mesh):
Per come disporre questi pochi componenti lascio il tutto alla vostra fantasia. Questo circuito alimenterà il nostro modulo ESP-01 con una batteria da 9V o, eventualmente, una serie di batteria AA. Inoltre, quello che non si capisce dallo schema, sono i collegamenti dei pin del modulo che sono i seguenti:
| Pin | Attacco |
|---|---|
| VCC | 3.3V |
| RST | non collegato |
| CH_PD | 3.3V |
| TXD | non collegato |
| RXD | non collegato |
| GPIO | 3.3V |
| GPIO2 | non collegato |
| GND | GND |
Software
Per quanto riguarda il software qui la questione si fa più insidiosa perchè tocca smanettarci un po’ di più. La libreria che ho usato è eps_wifi_repeater, disponibile su GitHub.
Per compilare e flashare il tutto trovate la guida direttamente sulla repo, noi ci limiteremo a flashare il tutto prestando attenzione al fatto che stiamo usando un ESP-01.
La prima cosa da fare sarà installare esptool, un programma che ci permette di flashare il nostro cosino con un semplice comando. Per scaricare esptool scrivete quindi:
git clone https://github.com/themadinventor/esptool.git
oppure potete procedere all’installazione tramite pip
pip install --upgrade esptool
Connettiamo il nostro ESP-01 al nostro pc utilizzando il connettore seriale-usb con questa connessione di pin: A questo punto scarichiamo la libreria per il wifi-repeater
git clone https://github.com/martin-ger/esp_wifi_repeater.git
cd esp_wifi_repeater
e flashamola direttamente sull’ESP-01 con il seguente comando:
esptool --port /dev/ttyUSB0 write_flash -fs 8m 0x00000 firmware/0x00000.bin 0x10000 firmware/0x10000.bin
Per qualche motivo su alcuni moduli non funziona, in tal caso flashamo la versione compilata con le SDK precedenti, eseguendo il comando
esptool --port /dev/ttyUSB0 write_flash -fs 8m 0x00000 firmware_sdk_1.5.4/0x00000.bin 0x40000 firmware_sdk_1.5.4/0x40000.bin
Let’s start
A questo punto abbiamo finito, attacchiamo l’ESP-01 al circuito, alimentato tramite la nostra batteria. Accendiamo il pc, connettiamoci alla rete myAP e, con connettendoci tramite telnet andiamo a settare i nostri parametri.
telnet 192.168.4.1 7777
Si aprirà una console del chip, inseriamo i seguenti comand1
set ap_open 0
set ssid NOME_DEL_TUO_WIFI_ATTUALE
set password PASSWORD_DEL_TUO_WIFI_ATTUALE
set ap_ssid NOME_NUOVA_RETE
set ap_password PASSWORD_NUOVA_RETE
save
show config
A questo punto abbiamo il nostro ripetitore. Certo, non sarà velocissimo, ma è veloce quel tanto che basta per una navigazione ordinaria senza dover fare streaming o cose grandi trasferimenti di file.